Start Snow for Windows
To start Snow for Windows double-click the application icon:Start -> Programs -> Snow for Windows ->
When you start Snow for Windows a little icon is added to the task bar at the right bottom of your screen:
Save settings: saves the current settings (registered programs only).
Next time you start Snow for Windows these settings will be used.
![]()
Stop Snow for Windows
You can stop Snow for Windows by clicking the icon: ![]() with the right mouse button.
with the right mouse button.
A pop-up appears where you can click "Exit".
Settings
When you click the icon ![]() in the lower right of your screen with the left mouse button you get the
following window, where you can specify the settings:
in the lower right of your screen with the left mouse button you get the
following window, where you can specify the settings:
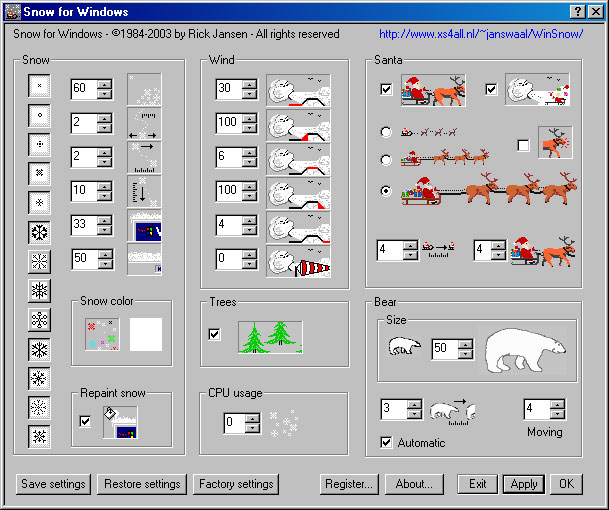
The icons have the following meaning:
![]() The number of snowflakes. (max. 20 in unregistered programs, 500 when registered,
though 50-100 is more realistic on normal computers.)
The number of snowflakes. (max. 20 in unregistered programs, 500 when registered,
though 50-100 is more realistic on normal computers.)
![]() The
"whirl" factor: how much snowflakes move from right to left and vice versa
The
"whirl" factor: how much snowflakes move from right to left and vice versa
![]() The
number of pixels a snowflake moves right or left each time
The
number of pixels a snowflake moves right or left each time
![]() The
number of pixels a snowflake falls each time
The
number of pixels a snowflake falls each time
![]() How thick snow will build up on windows
How thick snow will build up on windows
![]() How thick snow will build up on the task bar
How thick snow will build up on the task bar
![]() Santa or no Santa
Santa or no Santa
![]() Trees or no trees
Trees or no trees
![]() Santa blows with the wind (or not)
Santa blows with the wind (or not)
![]() Repaint snow: when you drag an icon from window to window, all snow will
have melted, by selecting this option you can have the snow automatically repainted.
Repaint snow: when you drag an icon from window to window, all snow will
have melted, by selecting this option you can have the snow automatically repainted.
Select the Santa you want:
![]()
![]()
![]()
![]()
![]()
![]()
![]()
![]() When checked Rudolf has a red nose! (Only with registered copies.)
When checked Rudolf has a red nose! (Only with registered copies.)
Bear
 The value here is a percentage you can vary from 0-100%
 This is the step the bear moves forward each time.
If you check the "Automatic" option the bear step is automatically set so that the bear will
take bigger steps if he's bigger. Else he may appear to do a moonwalk like Michael Jackson,
and that is SO last century.
This is the step the bear moves forward each time.
If you check the "Automatic" option the bear step is automatically set so that the bear will
take bigger steps if he's bigger. Else he may appear to do a moonwalk like Michael Jackson,
and that is SO last century.
 The smaller the number the smoother the bear moves.
Select the snow flakes you like:

You can select the snow flakes you like by clicking on every snow flake in
this list. Every square is a push button selecting or deselecting a snow flake.

Choose the color for the snow flakes by pressing the icon. The color you
selected is shown right.
Control the wind and how fast Snow for Windows runs:
 50: Snow for Windows runs every 50 milliseconds by
default (that is 20 times per second). If you make the number smaller
it will snow smoother, but Snow will use more CPU time.
If you make the number larger the snow will fall jerkier, but uses less
CPU.
50: Snow for Windows runs every 50 milliseconds by
default (that is 20 times per second). If you make the number smaller
it will snow smoother, but Snow will use more CPU time.
If you make the number larger the snow will fall jerkier, but uses less
CPU.
 4: The second number tells how often Santa moves.
 Make the number larger and Santa will move slower
(less often). This setting does not affect CPU usage.
Make the number larger and Santa will move slower
(less often). This setting does not affect CPU usage.
 40: The maximum force of the wind. If you set this to 0 (zero) there will be no wind
 30: This number is the minimum period in seconds between winds. Make
the number larger and the wind will blow less often, make it smaller and
wind will blow more often. This setting does not affect CPU usage.
30: This number is the minimum period in seconds between winds. Make
the number larger and the wind will blow less often, make it smaller and
wind will blow more often. This setting does not affect CPU usage.
 100: This number tells how fast the wind grows in force. A bigger number makes
the wind grow slower.
100: This number tells how fast the wind grows in force. A bigger number makes
the wind grow slower.
 6: This is the time in seconds the wind actually blows, before slowing down again.
 100: This number tells how quick the wind slows down. A bigger number makes
the wind slow down slower.
100: This number tells how quick the wind slows down. A bigger number makes
the wind slow down slower.
 4: This is the time in seconds it takes to stop the wind from full blast to zero.
Restore settings: restores the settings as you saved them last
time.
Factory settings: restores all settings to the default values.s
Rick Jansen, rick.jansen@xs4all.nl