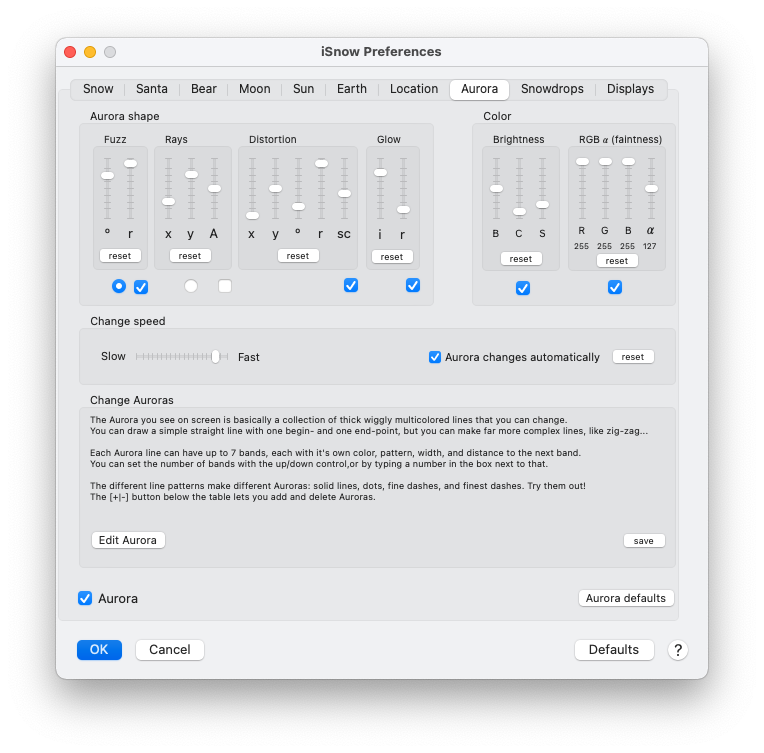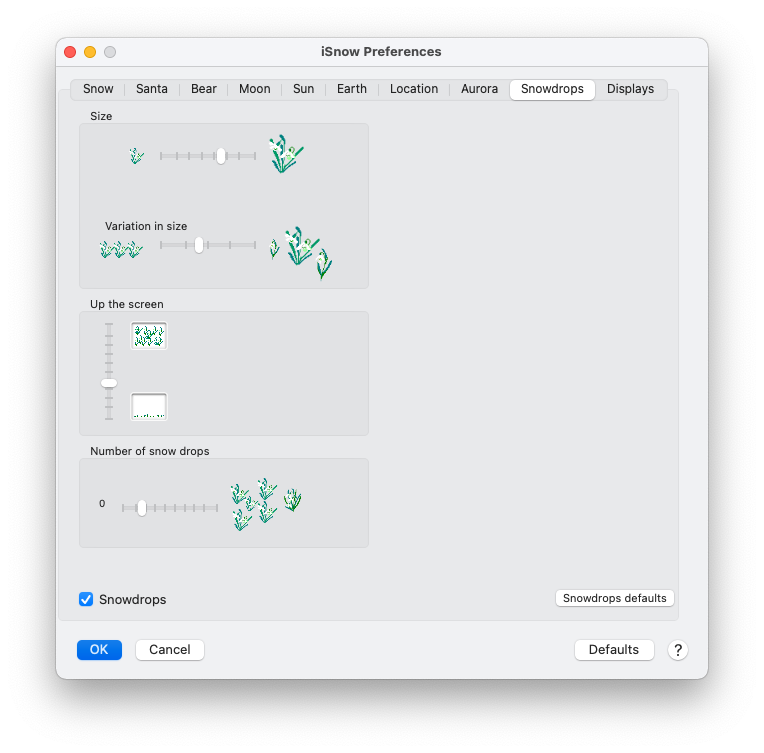
Preferences
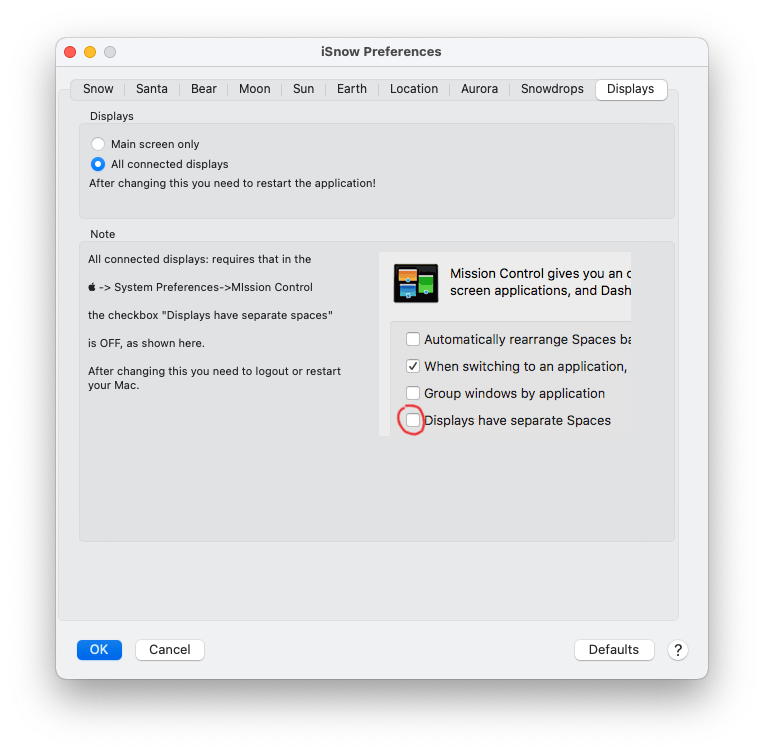
To change the settings go to the top of the screen, click iSnow in the menu bar, and select "Preferences..." from the menu.A window is shown where you can can select Snow, Santa, Bear, Moon, Sun, Earth, Aurora, Snowdrops and Displays. Geolocation.
There are very many options to change. If you made choices that you don't like there are buttons labeled "defaults", to reset to the default values.
If iSnow does not startup or crashes at startup: hold down the option-key while starting the application. [top]
[top]
[top]
This will reset the preferences. Please contact me if you cannot resolve this. [rick.jansen@xs4all.nl]
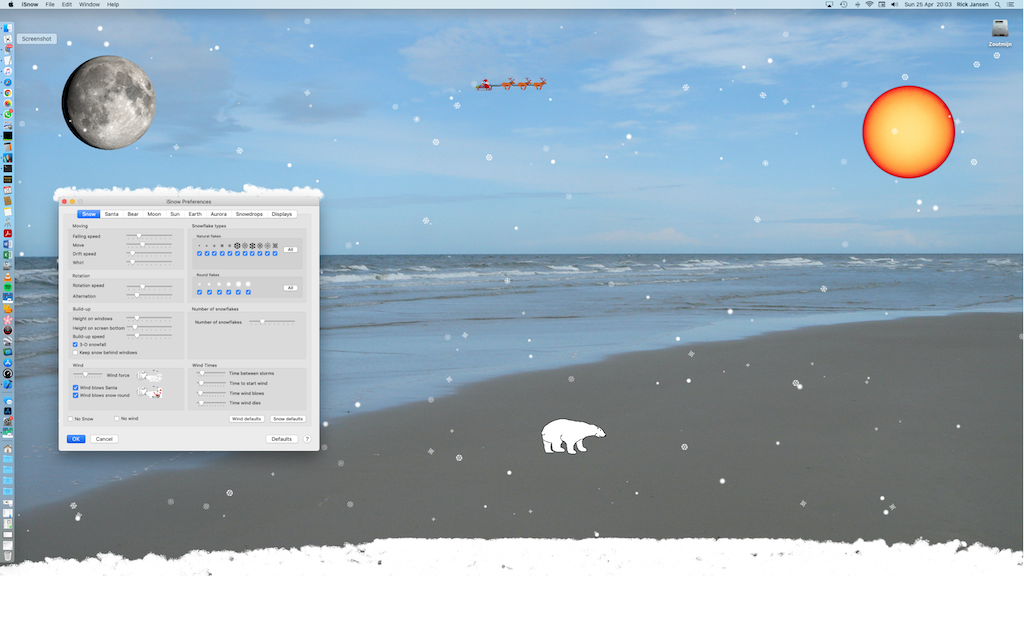
Snow
Here you can change the snow. There are sliders to make the snow fall faster or slower, rotate faster or slower.
More snowflakes means more CPU. For a nice layer of snow you don't need very many snowflakes.

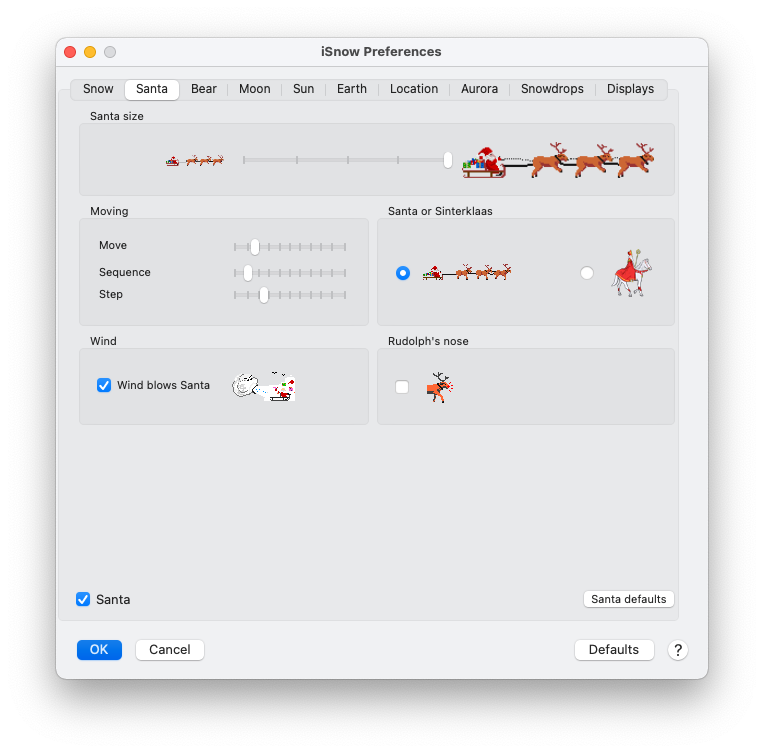
Santa
Bigger or smaller Santa, or Sinterklaas (Saint Nicholas) instead of Santa.
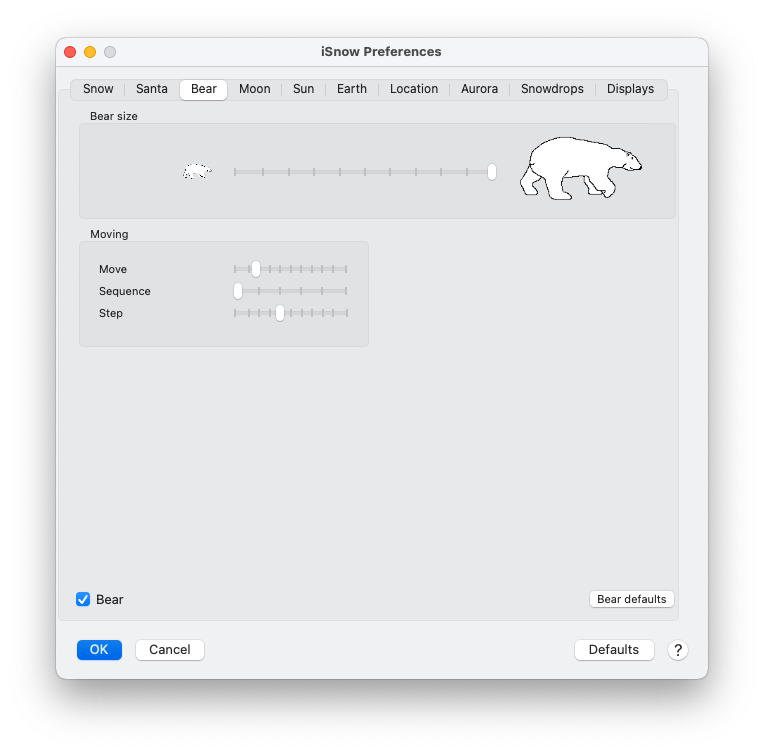
Bear
Bigger or smaller bear.
Moon
The Moon rotates around the Earth in 29.53 days, while keeping one side to us, as it's rotation duration is also 29.53 days.
So, we always see the same side of the moon, although there is a slight "wobble".
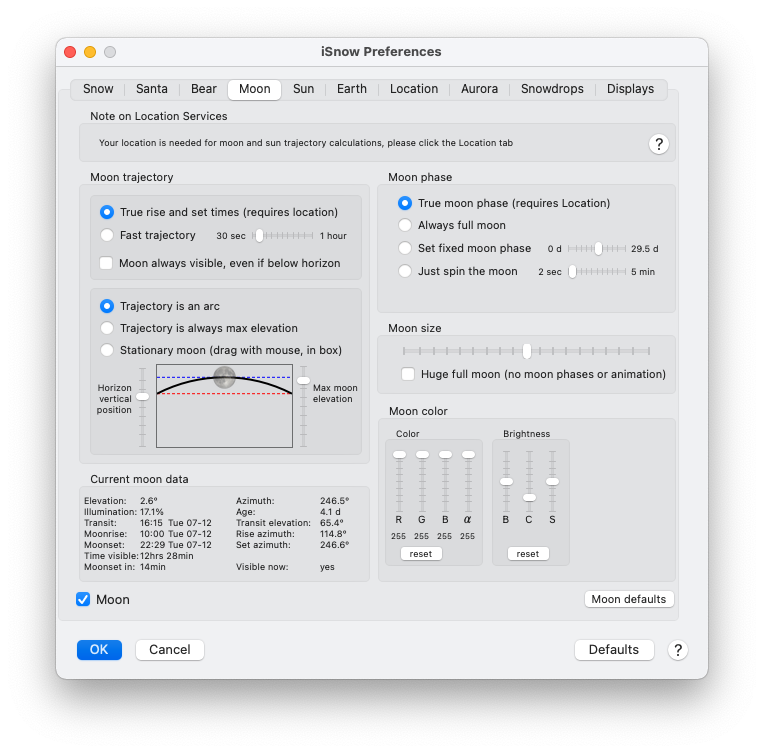
The Moon moves over your desktop, with proper rise and set times for your geolocation on Earth, and actual illumination is shown for the moon age. This is the default behaviour, shown when you have these options selected (see image below, left):
With these options selected the moon travels slowly over your desktop, as in the sky.
|
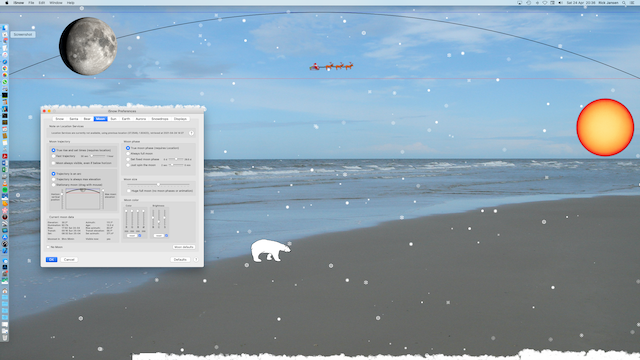
NB: the relative locations of Sun and Moon are genuine here, so the Moon is illuminated by the Sun on one side! |
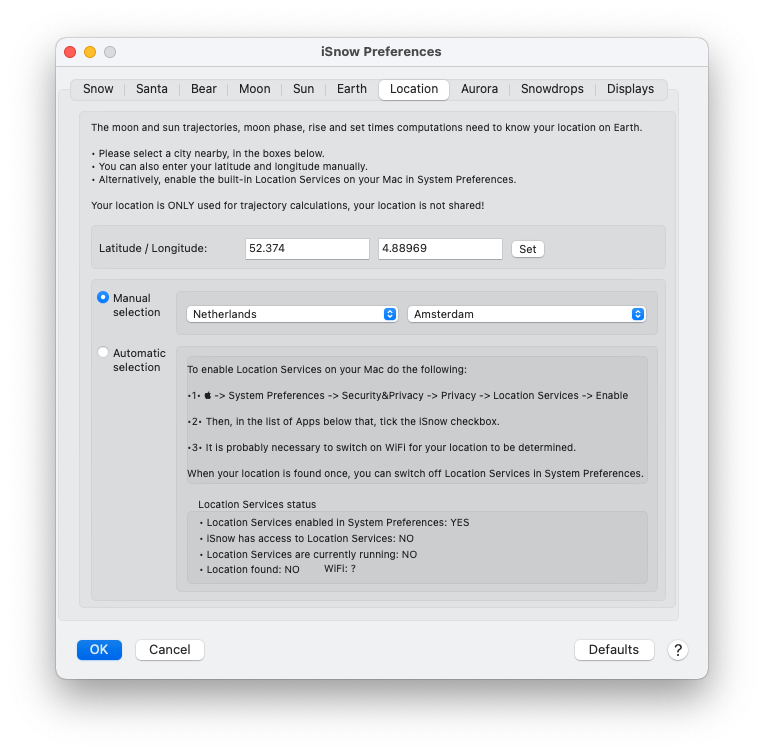
Note on Location Services
This tells whether location services are available to iSnow or now, or if a geolocation was determined before.Moon trajectory - timing and visibility
- True rise and set times
for your geolocation the actual rise and set times are calculated, the moon will cross the screen between those two times. - Fast trajectory
Normally the Moon will slowly travel across your desktop in exatly the time it traverses the sky, but if you want it to move quicker select the option "Fast trajectory", and set the duration of it's flight with the slider: from 30 seconds to 1 hour. - Moon always visible, even if below horizon
With true rise and set times selected the Moon will be invisible about 2/3 of the time, when it is below the horizon. If you prefer to have it always visible, just check this checkbox. The normal path will be repeated during the time between moonset and moonrise.
Moon trajectory - shape of the path
The Moon path is either an arc, or a straight line, or a single stationary location, depending on the options:- Trajectory is an arc
- Trajectory is always max elevation
- Stationary moon (drag with mouse)
The red dotted line is the horizon, the blue dotted line the maximum elevation. The black solid line is the Moon trajectory, between horizon and max elevation. The same lines will be (temporarily) shown on your desktop.
Stationary moon (drag with mouse): If you prefer the Moon to not move but stay in one spot on your desktop then select this option. You can drag the little Moon in the box, the Moon on your desktop will follow. (Sorry, you cannot drag the Moon on the desktop itself with the mouse, as it is behind everything.)
Moon phase
As the Moon rotates around the Earth during 29.53 days the illumination by the sun changes from full moon to almost dark, and back.- True moon phase: depending on your geolocation and the current date and time the true moon phase is calculated, and shown.
- Always full moon: regardless of the actual moon phase display the full moon, if you like that better.
- Set fixed moon phase: select the moon phase you like with the slider.
- Just spin the moon: if you are impatient and really cannot watch the Moon for 29.53 days, then select this option, and set the animation duration with the slider: 2 seconds to 5 minutes. NB: for the Moon spin animation a series of images must be loaded, which will take a few seconds. (It will also use extra memory.)
Moon size
Set the Moon size with the slider. Default it is set to 0.5, so you can have a far bigger or a much smaller Moon on your desktop.Huge full moon: tick this checkbox if you want a very large full moon. (This size Moon cannot spin.)
Moon color
If you are craving for a Blood Moon, for example, then have a go with the Color sliders. Values are RGB and α, α for transparency.Brightness, contrast and saturation can be changed with the Brightness sliders.
Current moon data
Displays the current calculated data on the Moon.- Elevation: the angle between the horizon and the current position in the sky. Negative if the Moon is below the horizon.
- Illumination: the percentage of the Moon illuminated by the sun. 100% if full moon.
- Rise: the date and time previous or next moonrise.
- Transit: the date and time the Moon reaches it's highest point in the sky.
- Set: the date and time of the previous or next moonset.
- Moonset/rise in: the next moonset or moonrise, whichever is next
- Azimuth: the current angle between the North and the position of the Moon.
- Age: the Moon cycle is 29.53 days, this value tells how far the Moon has progressed (full moon is in the middle, at 15 days).
- Rise azimuth: where on the horizon the Moon rises (angle between the North and that location).
- Transit elevation: the angle between the moon and the horizon at its highest point.
- Set azimuth: where on the horizon the Moon sets (angle between the North and that location).
- Visible now: yes/no
No Moon
Oh..(The moon does not use use any significant CPU, but the when the moon is "just spinning" some meory is used)
Moon defaults
Click this button to reset all settings to the default values.[top]
Sun
The Earth rotates around the Sun in 365 days, and rotates around its own axis in 1 day. So, we see the Sun traverse the sky, travelling an arc from sunrise in the east, and sunset in the west.
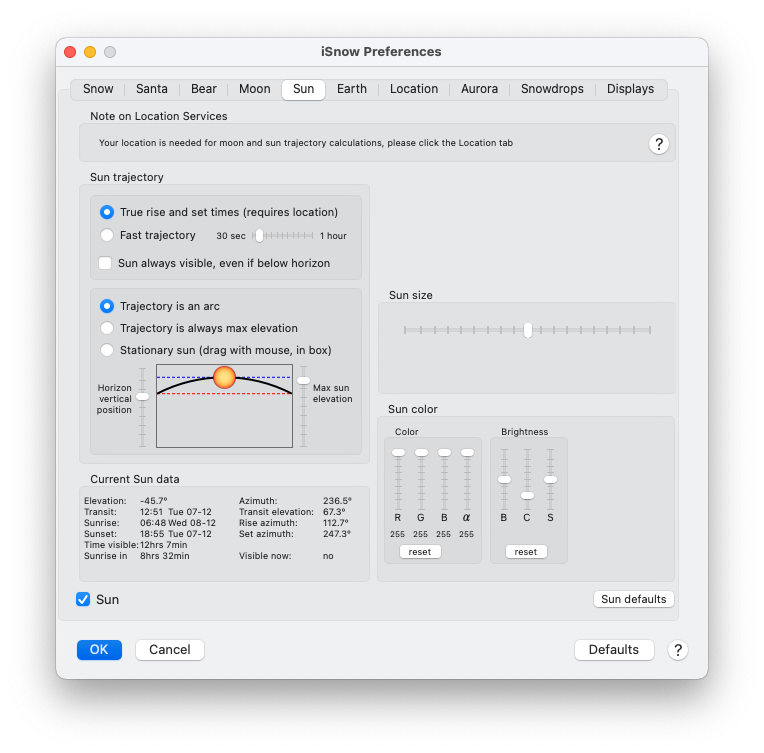
The Sun moves over your desktop, between the actual rise and set times for your geolocation on Earth. This is the default behaviour, shown when you have this option selected (see image below):
- Sun trajectory (top left): True rise and set times
 |
Note on Location Services
This tells whether location services are available to iSnow or now, or if a geolocation was determined before.Sun trajectory - timing and visibility
- True rise and set times
for your geolocation the actual rise and set times are calculated, the sun will cross the screen between those two times. - Fast trajectory
Normally the Sun will slowly travel across your desktop in exatly the time it traverses the sky, but if you want it to move quicker select the option "Fast trajectory", and set the duration of it's flight with the slider: from 30 seconds to 1 hour. - Sun always visible, even if below horizon
With true rise and set times selected the Sun will be invisible about 2/3 of the time, when it is below the horizon. If you prefer to have it always visible, just check this checkbox. The normal path will be repeated during the time between sunset and sunrise.
Sun trajectory - shape of the path
The Sun path is either an arc, or a straight line, or a single stationary location, depending on the options:- Trajectory is an arc
- Trajectory is always max elevation
- Stationary sun (drag with mouse)
The red dotted line is the horizon, the blue dotted line the maximum elevation. The black solid line is the Sun trajectory, between horizon and max elevation. The same lines will be (temporarily) shown on your desktop.
Stationary sun (drag with mouse): If you prefer the Sun to not move but stay in one spot on your desktop then select this option. You can drag the little Sun in the box, the Sun on your desktop will follow. (Sorry, you cannot drag the Sun on the desktop itself with the mouse, as it is behind everything.)
Sun size
Set the Sun size with the slider. Default it is set to 0.5, so you can have a far bigger or a much smaller Sun on your desktop.Sun color
If you are craving for a differently colored Sun, then have a go with the Color sliders. Values are RGB and α, α for transparency.Brightness, contrast and saturation can be changed with the Brightness sliders.
Current sun data
Displays the current calculated data on the Sun.- Elevation: the angle between the horizon and the current position in the sky. Negative if the Sun is below the horizon.
- Rise: the date and time previous or next sunrise.
- Transit: the date and time the Sun reaches it's highest point in the sky.
- Set: the date and time of the previous or next sunset.
- Sunset/rise in: the next sunset or sunrise, whichever is next
- Azimuth: the current angle between the North and the position of the Sun.
- Rise azimuth: where on the horizon the Sun rises (angle between the North and that location).
- Transit elevation: the angle between the sun and the horizon at its highest point.
- Set azimuth: where on the horizon the Sun sets (angle between the North and that location).
- Visible now: yes/no
No Sun
Oh..The Sun does not use use any significant CPU or memory.
Sun defaults
Click this button to reset all settings to the default values.[top]
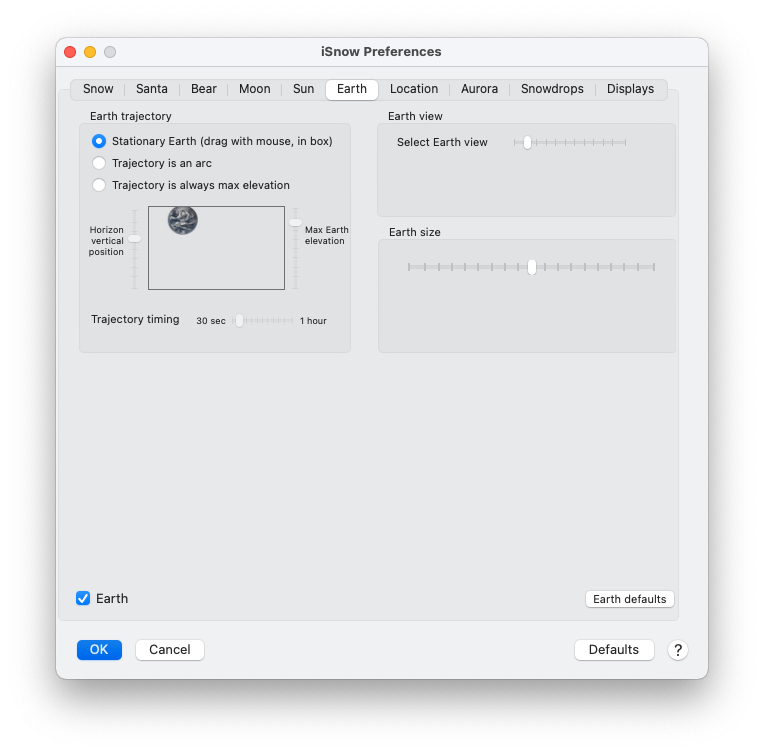
Earth
Even though the Earth is not visible in our sky you can have it on your desktop. Default it is stationary, in a location you can drag it to, but it can move, too, like the Moon or the Sun, timing is with the slider.
|
|